Terminalski supports generating private keys in Windows Hello; it protects your private keys using all the biometric user authentication methods such as fingerprint scanning and facial recognition built into your computer. You can also seamlessly use external security devices such as FIDO2 security keys and smartphones via Windows Hello.
However, when you are using such private keys for logging into SSH servers, you must authenticate yourself every time! Windows Hello requires user verification whenever its stored credentials are accessed. Nevertheless, it is an excellent security measure and should not be much of a hassle when your computer already has a biometric device such as a fingerprint reader.
But it is indeed annoying and impacts productivity, especially when you are already in a secure environment and want to open multiple SSH terminals to the same server or use SSH agent forwarding. In such cases, try 'Passphrase Master Key' feature in Terminalski!

You can use 'Passphrase Master Key' for automatically generating unique passphrases for various purposes such as encrypting private keys and logging into SSH servers with 'password' user authentication. Instead of entering your own passphrase, Terminalski pseudo-randomly generates a passphrase using the master key stored in Windows Hello and the public key component of the target you want to use the passphrase for. Hence you still can utilize Windows Hello for improving security and simplify your workflow.
-
When you generate a passphrase with the master key, it will be 32 characters long and all the printable ASCII characters between
0x21and0x7eare used (no space characters).!"#$%&'()*+,-./0123456789:;<=>?@ABCDEFGHIJKLMNOPQRSTUVWXYZ[\]^_`abcdefghijklmnopqrstuvwxyz{|}~ -
When you generate a passphrase master key, Windows Hello stores it in a security device of your choosing; it can be your local computer, FIDO2 security key, smartphone, etc. Terminalski also creates
passphrase_master_keyandpassphrase_master_key.pubfiles in its home folder, i.e.,<home-folder>\ssh, for actually accessing that stored master key in Windows Hello.If you want to generate the same passphrases on multiple computers with a common master key, you *must* first choose a removeable security device (ex. FIDO2 security key) when generating your master key, and copy
passphrase_master_keyandpassphrase_master_key.pubto the computer where you want to use the same passphrases. Even if you use the same security device, you will get different passphrases if you generate a new master key which will also create newpassphrase_master_keyandpassphrase_master_key.pubfiles.
-
For generating or replacing passphrase master key, you can use 'Generate Passphrase Master Key' button in .
-
Terminalski makes use of WebAuthn PRF (Pseudo-Random Function) and HMAC-SECRET for this feature. Unfortunately, those extensions are only available in recent versions of Windows Hello; you should be using Windows 11 25H2 or later. If you are using external security devices such as FIDO2 security keys and smartphones, make sure they support HMAC-SECRET extension.
For smartphones, you should also check the authenticator app that interfaces with Windows Hello. For example, if 'Samsung Pass' authenticator on Galaxy smartphones shows error messages, try 'Google Password Manager' app.


Private Keys
Using 'Passphrase Master Key' does not change how your private keys are stored in files. It simply generates a unique passphrase for its encryption and automatically enters it via Windows Hello when you want to decrypt it. In fact, you can manually save and enter the automatically generated passphrase in other traditional apps and tools for accessing your private key.

When the master key is used on a private key for its encryption, Terminalski creates a .pumk file for the private key; it contains the public key for the current master key, and it is used for easily determining whether or not to prompt you for Windows Hello. It is also used for confirming that the private key was actually encrypted with the current master key; if it does not match, Terminalski will show an error message instead of Windows Hello.
SSH Logins
You can use the master key to generate a passphrase for SSH 'password' user authentication. The host key of the connecting SSH server is used for deriving a unique passphrase. Hence, if the host key is changed even for some legitimate reason (ex. your host key preference is changed from ECDSA to Ed25519), you will also get a different passphrase and fail to automatically log in. In such cases, you must manually log into your SSH server with your current passphrase and change it to the new one. For that reason, we recommend securely saving the automatically generated passphrase once you have finished setting it up for your SSH server.
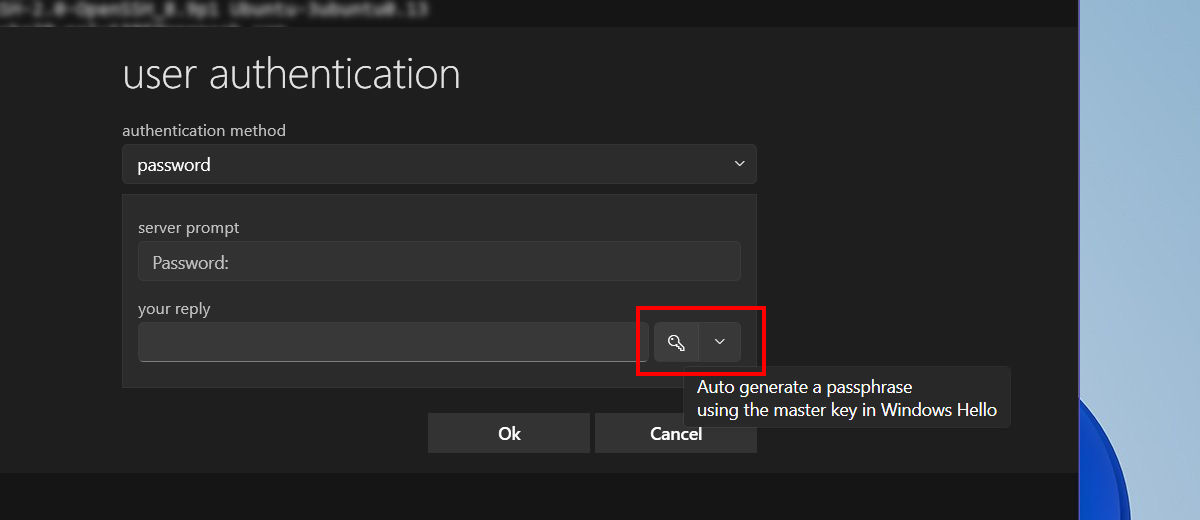
You need to explicitly click the master key button in order to get an automatically generated passphrase for your SSH server. If you want to skip this step and always try the passphrase master key first, enable 'Always try passphrase master key first' option.

If you want to send the same passphrase with the master key used for SSH 'password' user authentication, use 'Paste Login Passphrase from Master Key' on right-click popup menu. It also sends an ENTER key after the passphrase; if you do not want the trailing ENTER key, keep pressing the left or right SHIFT key starting just before completing Windows Hello.

Setting a Different Passphrase for 'sudo'
Once you start using the passphrase master key for your SSH servers, you just need to go through Windows Hello for their logins; if you have a fingerprint scanner for Windows Hello, just scan your fingerprint and you are logged in!
You normally do not need to enter any passphrase again once you are logged in except for running system administrative commands. Such commands are usually executed with sudo in Linux based systems.
You can use 'Paste Login Passphrase from Master Key' on right-click popup menu for entering your passphrase for sudo command. However, if you prefer directly entering a different passphrase just for sudo, you can indeed configure it to do so by changing the user account it actually uses for carrying out your commands.
The following outlines how you can set 'root' account for sudo. 'root' account is a good candidate for sudo as SSH servers usually do not allow 'root' account for direct password logins (= default settings) and it already has necessary permissions and privileges to run system administrative tasks.
- Set a passphrase for 'root' account
sudo passwd root
- Open '
sudo' configuration filesudo visudo
- Add the following line to the configuration file opened in Step 2
Defaults rootpw
- Save and close the configuration file
- '
sudo' now requires the passphrase for 'root' account